In my blog post “Vembu BDR Suite 5.5 released” I gave an overview of the Vembu BDR Suite, the new features and enhancements in version 5.5, the Vembu BDR Suite Editions and the Licensing and Pricing of the Vembu BDR Suite.
In this blog post I will focus a little bit more on Vembu Backup for Microsoft 365, one of the solutions of the Vembu BDR Suite.
Why Backup Microsoft 365
As per Microsoft’s Shared Responsibility Model, Microsoft focuses predominantly on application uptime and the underlying infrastructure (Hardware/Software failures and Power outages).
 Microsoft 365 does provide a wide range of native data protection features like In-place hold, Litigation hold, Data loss prevention, Safe sharing, Location based access, Role Based Access Control (RBAC) etc., to safeguard your data. However, It’s still your responsibility to protect your business data as there are numerous threats like hacking attempts, accidental/malicious deletions, unforeseen data corruption, organizational data retention gaps etc.
In essence, this is a shared responsibility model, where you/your organization needs to perform regular backups using a third-party backup software to protect your business critical data to meet business continuity and disaster recovery needs.
Microsoft recommends to regularly backup content and data using third-party solution (See Microsoft’s Service Agreement)

Key Features of Vembu BDR Suite for Microsoft 365
- Exchange Online Backup
- Backup the entire exchange online domain including all users’ email accounts or individual user’s email account to your on-premises or Vembu Cloud. It backs up inbox, sent items and other custom labels of exchange online email
- Contacts and Calendar Backup
- Backup the contacts and calendar of exchange online user account to your On-Premise or Vembu Cloud.
- Mail Level Restore
- Users can do Microsoft 365 mail level restore to the same or different user account
- Anywhere Anytime Access
- Backed up Office 365 data is stored in Vembu cloud hosted in Amazon Web Services and can be restored anywhere anytime.
- OneDrive for Business Backup
- Backup all documents from OneDrive to Vembu Cloud. It backs up text documents, spreadsheets, presentations, photos, pdfs, etc., from Office 365
- SharePoint Online Sites Backup
- Backup your SharePoint Online data including Sites, Libraries and Folder/Items, etc., and store them in your On-premise storage mediums or Vembu Cloud.
- Group/Shared Mailboxes
- Backup your Microsoft 365 Shared/Group Mailboxes including Group Conversations, Group OneDrive & Calendar and store them in your On-premise or Vembu Cloud.
- Secure Data Transfer
- The AES 256 bit encryption algorithm will secure your Microsoft 365 data from unauthorized access while transferring the data over internet and at-rest
- View Emails
- Users can view the individual backed up emails and export them in different formats like .eml, .pst files
Editions
Vembu Backup for Microsoft 365 comes in two (2) Editions:
- Free Edition
- Standard Edition

General Configuration of Vembu BDR Suite for Microsoft 365
The process to start backing up your Microsoft 365 environment consists of 3 parts
- Setup BDR Suite Backup Server
- See my previous blogpost on Vembu BDDR Suite for Endpoints
- Setup a BDR Suite Backup Repository
- See my previous blogpost on Vembu BDDR Suite for Endpoints
- Configuring on-premises storage as a backup repository for Microsoft 365 might not feasible as the amount of data to be backed up is potentially very high. Therefore it might be a good option to choose for a cloud storage solution like Amazon S3, Google Cloud Storage, Wasabi, …
- Adding Data sources
- Register Vembu BDR Suite application with Azure Portal
- The BDR Suite Offie 365 application can be added manually or automatically to the Azure portal. The below steps describe the manual process:
- See also https://www.bdrsuite.com/guide/vembu-bdr-suite/5-5/en/registering-vembu-office-365-application-in-the-microsoft-azure-portal.html
- The steps to follow are the following:
- Login to the Azure Portal as an administrator
- In the search bar type “App registration” and click on the “App Registrations” Services link
- Click “New Registration”
- Provide the below info for the app registration and click “Register”
- Name for the App registration
- Supported account types: select “Accounts in this organizational directory only”

- You will be redirected automatically to the App Registration overview page. Note down the Application (client) ID for the VembuBDR App registration and the Directory (tenant) ID as you will need them later on when connecting Vembu BDR Suite with Microsoft 365
- Generate an application password
- Select “Certificates and Secrets”
- Click “New Client Secret”

- Provide a description and an expiry period and click “Add”
- Copy the Value (=Application password) of the secret key you just created. As this will only be displayed once, it is important to copy it and keep it in a safe location. If you forgot the value (or after the expiration period), you will have to create a new secret key.
- The BDR Suite Offie 365 application can be added manually or automatically to the Azure portal. The below steps describe the manual process:
- Add your Microsoft 365 Organization in Vembu BDR Suite Backup Server
- See https://www.bdrsuite.com/guide/vembu-bdr-suite/5-5/en/adding-your-microsoft-365-domain.html
- The steps to follow are the following:
- Open the management console of BDRSuite
- Go to Microsoft 365/Google Workspace in the top menu bar.
- Click “Add Microsoft 365 Organization”
- Choose “Add Microsoft 365 Organization Account as a Data Source and Authorize BDRSuite for Access Using Automatic Process” and Click “Next: BDRSuite Authorization”.
- NOTE: When performing the automatic process the Azure app registration as described above will be done completely automated and is therefore not needed to be done manually.

- Copy the One-Time Authorization Code for BDRSuite, Open a new browser window and go to https://microsoft.com/devicelogin
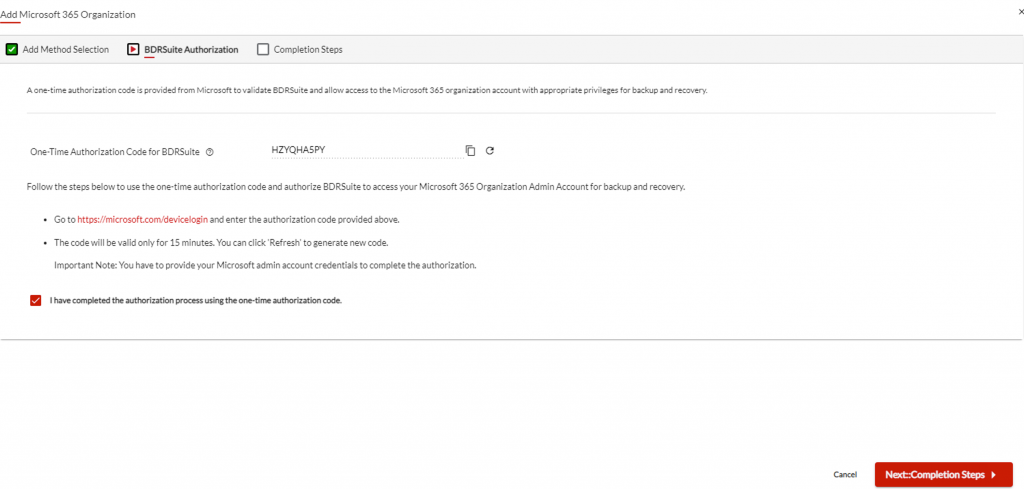


- Select “I have completed the authorization process using the one-time authorization code” and click “Next: Completion Steps”

- The Tenant ID, Application ID and Application Password will be automatically filled out. Click on “Save”

- Confirm you want to add the Microsoft 365 Organization by clicking on “Save”

- Now you will see in the BDRSuite console the M365 Organization added

- In the Azure Portal you will see the automatically created app registration

- Register Vembu BDR Suite application with Azure Portal


Backup and Restore
Once the configuration has been done the process to backup and restore Office 365 is very simple
Backup
- Open the management console of BDRSuite
- Go to Microsoft 365/Google Workspace in the top menu bar.
- Click “Configure Backup” – “Microsoft 365”
- Provide a backup name, choose a Backup repository and optionally provide a Job Description and click “Next: Organization & Backup Objects Selection”
- Choose the organization name to backup, which backup objects you want to backup and click “Start Backup Configuration”
- Depending on your previous selection you will see different screens to be abel to select the specifics of what you want to backup. In the below screen you can see the choices when you selected to backup User Mailboxes
- The next step to configure is the schedule and the retry attempts
- After you defined the schedule you can define to enable compression and retention settings
- The last step shows you an overview of your choices and you can Save your backup job. You can select to “Run this backup immediately after saving”
- You will now be redirected to the “List of backup Jobs” where you can see the status of the backup
- Once the backup is finished you can see a detailed report in the section Reports – Recent Job Schedule – Microsoft 365. For the purpose of the blog, I performed a very small backup job (1 mailbox user only calendar items)


Restore
- Open the management console of BDRSuite
- Go to Microsoft 365/Google Workspace in the top menu bar.
- Click “Recover”
- Here you will see all your defined backup jobs. Select “Restore” next to the backup job from where you want to restore items
- Select what you want to restore and click “Start Restore Configuration”
- Select the following details:
- Domain
- Restore version (date/time)
- Which entity you want to restore (e.g. entire mailbox, mails, Archive Mailbox, Onedrive, Calendar Events, contact)
- You can restore a complete mailbox, a folder, an individual item, …
- There is a very fast search function to search for individual mails
- You can restore a complete mailbox, a folder, an individual item, …
- Where you want to restore (Same mailbox, other mailbox)
- Review your selection and hit the restore button. The restore starts immediately.
- In the reports selection you can see the result of the restore


References
BDRSuite 5.5 – Microsoft 365 backup and recovery solution: https://www.bdrsuite.com/microsoft-office-365-backup-solution/
BDRSuite 5.5 Release Notes: https://www.bdrsuite.com/pdf/release-notes/vembu-bdr-suite-release-notes.pdf
BDRSuite 5.5 for Microsoft 365 Documentation: https://www.bdrsuite.com/guide/vembu-bdr-suite/5-5/en/vembu-backup-for-microsoft-office-365.html
Overcoming Microsoft 365 Backup Challenges with Vembu Microsoft 365 Backup Webinar